

How do I prepare for the new term?
As you gear up for the start of a new term, here is a best-practices checklist for how to set up and manage your instructional technology, including software, websites, recordings, and classroom AV equipment. This is not meant to be a complete user guide for any of the products/platforms listed.
On Preparing your New Template course:
The new template version of your course should contain everything except for things that are unique to a specific year-term like your syllabus, student groupings, or due dates for assignments.
It is critical that all the logic and mechanisms on which your grade calculations rely be built into your assignments, assignment groups and gradebook settings so things can be tested before you copy into your live course. This includes weights, bonus points, and special rules and allowances. Placeholders should be created for any/all assignments pertaining to your course. This will ensure your course runs smoothly and transparently according to what you outlined in your syllabus.
Do not wait until grading time near the end of the term to worry about this. Please reach out if you believe you’ll need help with this.
How do I add previously prepared Panopto videos to my Template course?
Many faculty build video tutorials into their courses. These are different from recordings of lectures students can watch if they missed class. In order to ensure all students can view your prepared content, you need to properly embed the video into a Page (or anything else with a Rich Content Editor, like an assignment) using these instructions from Panopto on How to Embed Panopto Videos in a Canvas Course.
Importing Content to your Live Course
IMPORTANT: This import process is performed by TLC/IT staff before each term.
Each term you will see an empty live course appear. This is where the students are enrolled. The first step is to import course content from Master courses into the new term-specific course. After the import, you will be able to continue setting up your course by doing the following:
Manage student access to your Live Canvas course (not the Template)
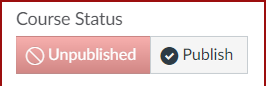
- Ensure your live course is set to “Published” in the upper right corner on the Home page or course settings.
- If you are working on Pages, Modules, or parts of Modules and don’t wish to have them seen by students, set as “Unpublished”. Anything set to unpublished will be completely invisible to all students in your course.
- Please also double check that all the Navigation sections on the left side of your course are set such that students can or cannot see them as you intend.
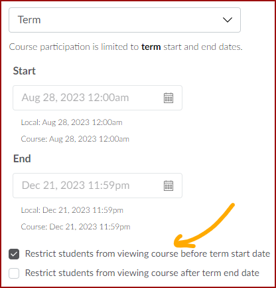
- To allow students access to your course BEFORE the scheduled start date of the course (optional), you need to uncheck the box that restricts this access.
- If you’re needing to accommodate a student who is joining your otherwise in-person-only lecture via Zoom, review this TLC guide on Accommodating Remote Students with Zoom for how to post the info, and lock down your Zoom meeting if necessary.
Create your course’s Panopto folder
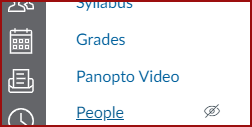
- In order to furnish your course with its corresponding linked folder in Panopto, you need to visit the Panopto Video section in Canvas at least once before the start of your first class. Once the page loads, your folder will have been created.
- If you do not see it in the Navigation list, enable the Panopto Video section from the “Navigation” tab of Course Settings.
Where is my current course folder in Panopto?
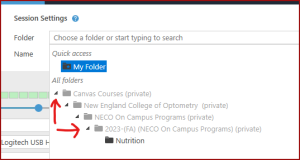
- When you are about to record using Panopto, or are moving a recording so students in a course can see them, find your Canvas course folder by expanding the nested directory structure shown below. Be sure to click on the small arrows to the left of each folder to expand them, which will reveal the sub-folders. You will not have permission to record into any of the folders within this structure except the individual course folders.
Auto-sending recordings made by Zoom to your course folder
- When you use your official course Zoom link, the meeting will be automatically recorded in the cloud (unless otherwise requested). Once you end the meeting, the recording gets pushed to Panopto, landing in the single/lead IOR’s personal “My Folder” location in a sub-folder called “Meeting Recordings”.
- To set specific Zoom meeting recordings to be placed automatically in specific folders, see these instructions on How to assign folders for incoming meeting recordings.
- Otherwise, for students to see these recordings, the IOR must complete these instructions for Managing Panopto Recordings Created by Zoom.
- Please DO delete any recordings that you do not wish to keep/use!
PointSolutions
While content creation remains mostly unchanged from what we’re used to, there is a new workflow for instructors using Echo 360 or PointSolutions (formerly TurningPoint). We’ve created a guide detailing the process all instructors who use PointSolutions should follow. These steps should eliminate issues regarding licenses and registrations, and will allow you to upload polling results directly to your Canvas course grade books. Please refer to the illustrated step-by-step guide on how to set up PointSolutions with Canvas. In brief, the steps are:
- The IOR or an editing teacher enables the PointSolutions link in their course navigation under Settings.
- Log into our Echo360 site and activate the course (each instructor does this for themselves).
- Clean up your Active Courses tab by deleting older courses (non-destructive)
- Double-check your course roster and update/sync if necessary
- Make sure you have the latest version of the desktop app installed for PC/Mac
- Refer to the content creation guides for Mac users and PC users
ExamSoft
When posting your assessments, please set the download period to start the day or evening before your exam so students can have time to troubleshoot. One thing we would like everyone to do starting this fall is to avoid re-uploading questions that already exist in your collection. In brief, here is the proper workflow for setting up a new version of an exam you’ve given previously:
- Start by duplicating the previously used assessment
- Make any necessary edits/alterations directly to the existing questions
- Delete from the exam any unwanted questions
- Only upload/create questions if they are completely new, or are alternate versions of previously used questions you want to preserve, then add these to the new exam.
Whenever possible, we encourage you to use the following naming convention for all your questions:
“Course-Topic-QuestionName” example: “Anatomy-spine-herniation03”
Starting class at shared computers
Please remember that each of us use the shared computers in the classrooms in different ways, and we each have to be responsible for the specific settings that we prefer. Here is a checklist of things to do before and after every class. While it’s possible for us to delegate some of these items to the AV student techs, many require your credentials, your files, and your specific preferences, so it’s important that you know how to perform the following sequence. This will generally take 10 minutes or less:
- Launch the AV system by choosing a source
- Choose your wireless mic (if using) from the charging holster and turn it on
- Set the microphones to mute/unmute according to what you want to use on the touch panel
- Turn on or wake the PC and sign in, OR attach your laptop to the AV system
- If using the PC, ensure that:
- The display setting is what you want – Duplicate vs Extended mode (Win-P to check)
- No one is signed into Chrome
- No one is signed into Zoom
- If connecting your laptop, ensure that
- The USB cable is connected to your laptop
- The HDMI cable is connected to your laptop
- Launch the PointSolutions application FIRST if using
- Set the computer display mode according to your needs
- IF USING ZOOM:
- Launch your Zoom meeting from the handy folder on the desktop of the PC.
- When prompted, “click here to sign in” and then sign into Zoom using the “G” button
- Choose or enter your Google account information, using your mobile device for 2FA
- Once the Zoom meeting is running, run the speaker/microphone check
- Start your screen share according to your preferences
- Open your PowerPoint presentation(s) and test it
- Launch Panopto Recorder (if you’re not already recording with Zoom)
- Test the presenter remote and SMART Monitor stylus if using (“reset” the stylus/touch by unplugging and re-plugging the white USB cord from the rear left of the SMART Monitor)
- Launch the slideshow and begin class
At the end of every class, take these steps:
- End the Zoom meeting for all
- Sign out of the Zoom app, Panopto Recorder AND Chrome (if using the PC)
- Put wireless mics back in the charger
- Shut down the AV system if you’re not immediately followed by another instructor
Overflow:
LH3’s overflow room will be CR 3202 and LH2 will continue to use Scott Room.
Need Extra Support?
Reach out to the TLC team any time you’d like a hand with your Academic Technology setup before the term starts.
-
- Email: tlc@neco.edu
- Send us a request: Request Support